Ever watched a movie scene where the lighting felt just... wrong? Maybe a character is sitting in a dark room, but their face is lit perfectly from the front with no visible source. It breaks the spell. You stop believing in the world on screen because the physics don’t make sense. This is where motivated lighting comes in.
Motivated lighting isn't just a technical trick for directors of photography. It is the bridge between reality and cinema. It answers the question: "Why is this light here?" When you get it right, the audience accepts the image as truth. When you get it wrong, they see the crew behind the camera. In this guide, we break down how to use practical sources and story logic to create lighting that feels earned, not just added.
What Is Motivated Lighting?
At its core, motivated lighting means every beam of light hitting your subject has a logical reason for existing within the scene's universe. If a character is standing by a window, the light should come from the window. If they are reading a book at night, the lamp on the table should illuminate their face.
This concept differs significantly from standard three-point lighting, which was designed for television and stage to ensure visibility regardless of context. Three-point lighting often ignores the environment. Motivated lighting respects the environment first, then adjusts for exposure and mood. It requires you to think like an architect before you think like a painter.
Motivated lighting creates visual believability by anchoring illumination to diegetic or plausible non-diegetic sources. It balances aesthetic needs with narrative logic, ensuring the audience remains immersed in the story rather than distracted by artificial setup cues.
The Role of Practical Light Sources
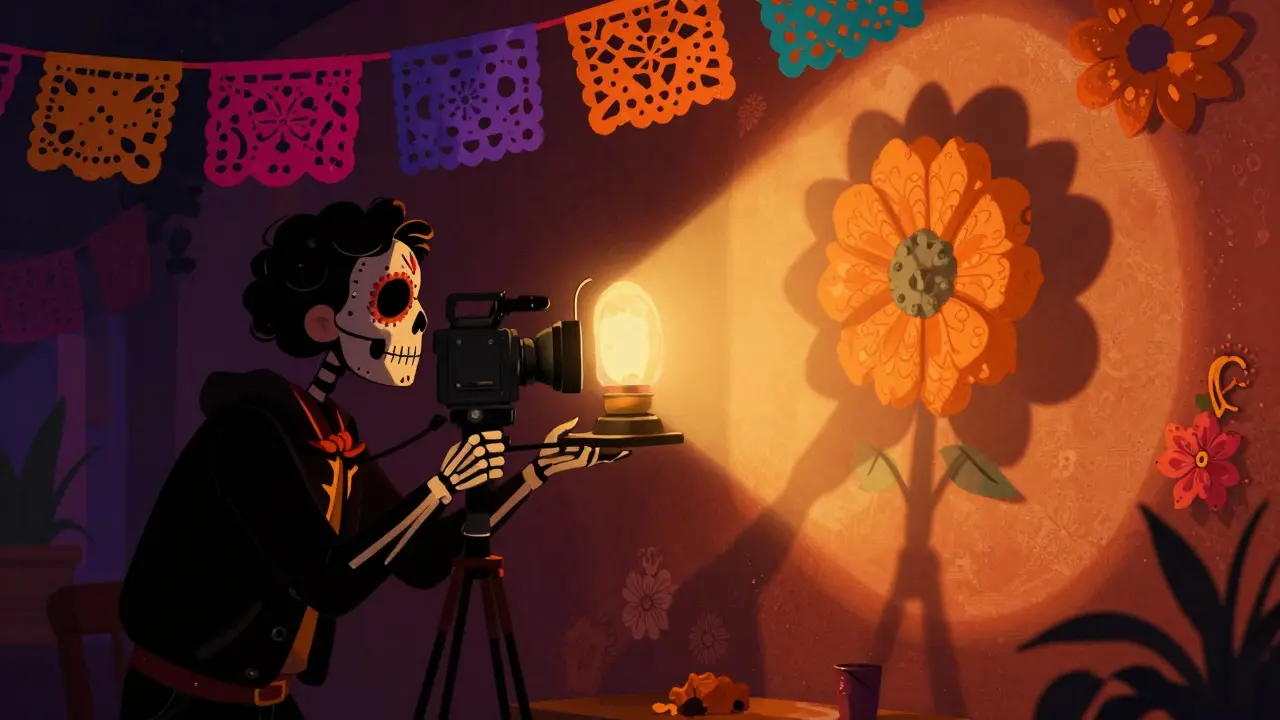
Practical lights are any light fixtures visible within the frame that actually emit light. A desk lamp, a neon sign, a computer monitor, or a fireplace-all are practicals. They are the easiest way to motivate your lighting because the source is already there for the viewer to see.
Practical Lights are visible light sources within the scene that contribute to the overall illumination and mood. They serve a dual purpose: they establish the setting and provide key fill or accent lighting.Using practicals effectively involves more than just turning them on. You need to control their intensity and color temperature to match your desired look without blowing out the sensor. Here is how professionals handle common practicals:
- Desk Lamps: Often too dim for modern digital sensors. Add a small LED panel behind the shade to boost output while keeping the bulb itself visible. Use diffusion to soften harsh shadows if the scene calls for intimacy.
- Windows: The most powerful natural practical. Control the angle by moving the set closer or further from the window. Use flags (black fabric) to block unwanted spill and negative fill to deepen shadows on the opposite side.
- Neon Signs: Great for color accents. Place the actor close to the sign for a strong rim light. Be careful with flicker; many older neon transformers cause strobing effects on high-frame-rate cameras. Use DC-powered LED replacements if consistency is critical.
- Screens: Computer monitors and TVs provide soft, even frontal light. Increase brightness settings and reduce gamma to avoid hotspots. This works well for interrogation scenes or late-night coding sequences.
The key is interaction. The light must interact with the texture of the walls, the dust in the air, and the surface of the actors' skin. If the practical looks like it’s glowing but casting no shadow, it fails the test.
Story Logic and Emotional Tone
Lighting is never neutral. Every choice you make sends a signal to the subconscious of the viewer. Story logic dictates that the lighting must reflect the internal state of the characters or the external pressure of the plot.
Consider a thriller. If a detective is interrogating a suspect, the lighting might be high-contrast, motivated by a single overhead bulb. This creates deep shadows under the eyes and nose, suggesting deceit and tension. Now consider a romantic comedy. The same overhead bulb would feel oppressive. Instead, you might motivate the light from a nearby café window, creating softer, warmer tones that suggest openness and connection.
Ask yourself these questions before setting up your lights:
- What is the emotional goal of this scene?
- Where would a real person expect light to come from in this location?
- How can I enhance the emotion without breaking the physical rules of the space?
If the answer to question two conflicts with question one, you have a problem. You cannot simply add a big softbox from the left if there is no wall or window there. You must find a creative solution. Maybe you bounce light off a white poster on the wall. Maybe you use a practical mirror to reflect light from another source. The constraint breeds creativity.

Natural vs. Artificial Motivation
Not all motivated lighting comes from objects inside the room. Sometimes the motivation is environmental. Sunlight streaming through blinds is a classic example. Even if you are shooting indoors at night, you can simulate daylight using large HMI lamps placed outside windows. The audience accepts this because windows let in light. That is the logic.
However, there is a fine line between motivated lighting and unmotivated enhancement. Pure motivated lighting relies solely on sources present in the scene. Most films use a hybrid approach. They start with motivated sources and then add subtle, invisible fill to lift shadows just enough for detail. This fill must be undetectable. If the viewer can guess where the extra light is coming from, you’ve broken the illusion.
| Approach | Source Visibility | Primary Goal | Audience Perception |
|---|---|---|---|
| Pure Motivated | All sources visible | Realism | Immersive, documentary-like |
| Hybrid Motivated | Key sources visible, fill hidden | Balanced aesthetics | Cinematic yet believable |
| Unmotivated (3-Point) | No sources visible | Clarity and visibility | Stylized, theatrical |
Common Pitfalls to Avoid
Even experienced cinematographers fall into traps when trying to motivate light. Here are the most frequent mistakes:
- Ignoring Color Temperature: A tungsten desk lamp emits warm light (3200K). If you balance your camera for daylight (5600K), the lamp will look orange. If you want it to look natural, either gel the other lights to match or shoot in Log and grade later. Mixing temperatures randomly creates chaos.
- Overpowering Practicals: Don’t let your background lights overpower the motivated foreground lights. The hierarchy must remain clear. The primary source should always dominate the visual weight.
- Flat Shadows: Digital sensors capture immense dynamic range. If you fill every shadow, you lose depth. Let some areas go dark. Darkness tells the audience what to ignore and adds mystery.
- Inconsistent Direction: Ensure all light sources point in consistent directions relative to the geography of the set. If the moon is rising in the east, all exterior-motivated interior lights should come from the west-facing windows.

Tools for Modern Cinematographers
Technology has made motivated lighting easier than ever. Small, powerful LEDs allow you to hide lights in tight spaces. Bi-color LEDs let you adjust warmth instantly to match mixed environments. But tools don’t replace thinking.
Bi-Color LED Panels are versatile lighting instruments capable of shifting color temperature from warm tungsten to cool daylight. They enable precise matching of mixed lighting environments without changing gels.When selecting gear, prioritize form factor. Can you mount this light on a ceiling fixture? Can you tape it to a wall? The smaller and quieter the light, the more freedom you have to place it logically within the scene. Battery-operated units eliminate cable management issues, allowing you to position lights in places that were previously impossible.
Case Study: The Interrogation Room
Let’s apply this to a specific scenario. An interrogation room. Typically bare concrete, one metal table, two chairs. No windows. One overhead fluorescent tube.
Step 1: Identify the Source. The fluorescent tube is the only logical source. It will cast hard, unflattering shadows downward. Eyes will be hidden in sockets. Foreheads will shine.
Step 2: Enhance the Mood. To increase tension, don’t soften the light. Keep it hard. Maybe add a slight green tint to the fluorescent bulb to evoke sickness or decay. This is still motivated because old fluorescents often have a greenish hue.
Step 3: Add Subtle Fill. If the shadows are too black, bounce a tiny amount of light off the white shirt of the interrogator onto the suspect’s face. This is motivated by reflection. It keeps the logic intact while providing just enough detail to read micro-expressions.
Step 4: Check Continuity. Ensure the direction of the shadows matches the position of the tube light in wide shots versus close-ups. If the tube is centered, shadows should fall straight down or slightly forward depending on head tilt.
Conclusion: Trust the Audience
Motivated lighting respects the intelligence of your viewers. They know how light works in the real world. When you align your cinematography with those expectations, you remove friction. The audience stops looking at the technique and starts feeling the story. It is not about hiding the craft; it is about making the craft invisible so the emotion can shine through. Start with the source. Build the logic. Then paint with light.
What is the difference between motivated and unmotivated lighting?
Motivated lighting uses visible or logically implied sources within the scene (like windows or lamps) to illuminate subjects. Unmotivated lighting, such as traditional three-point setups, places lights purely for aesthetic or visibility reasons without regard for the scene's physical reality.
Can I use motivated lighting in a fantasy or sci-fi movie?
Yes. Even in fantastical worlds, lighting must follow internal logic. If a spaceship has a sunlamp, that is the motivated source. If a wizard casts a light spell, the glow from their hand becomes the motivated source. Consistency within the established rules of your world is key.
How do I deal with low-light situations using motivated sources?
Use high-sensitivity cameras (large sensors, high ISO capability) and open apertures. Boost practical lights safely (e.g., adding LEDs behind shades). Use available ambient light from neighboring rooms or streetlights through windows. Embrace grain or noise if it serves the gritty aesthetic.
Is motivated lighting harder to achieve than standard lighting?
It requires more planning and problem-solving. You cannot simply place a key light anywhere. You must work around the set design and props. However, once mastered, it speeds up decision-making because the 'why' of each light is predetermined by the environment.
What equipment is best for motivated lighting?
Small, versatile LED panels are ideal. Brands like Aputure, Nanlite, and Godox offer compact bi-color units. Dimmable bulbs that fit into standard sockets are also crucial for replacing practical fixtures. Diffusion materials like silk or grid cloth help shape the light naturally.